热点图

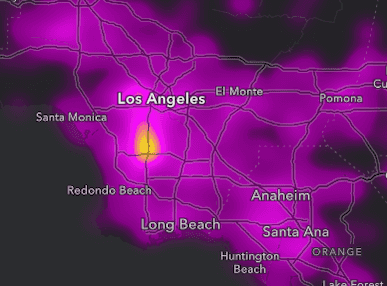
表示为连续热点图的致命车祸 (2017 年)。交通事故多发区为黄色。

什么是热点图?

热点图将点要素渲染为栅格表面,以使用连续色带强调具有较高点密度的区域。

为什么热点图很有用?

热点图可用作聚类不透明度光晕的替代方法,以可视化重叠点要素。与这些用于可视化密度的替代技术不同,您可使用热点图根据数据值对点密度进行加权。这可能会揭示一个与仅使用位置计算密度不同的模式。

仅位置热点图数据加权热点图
classed with no label
致命车祸的密度图(2017年)。黄色区域表示交通事故的高发区。
classed with no label
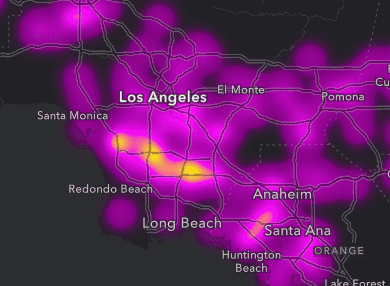
涉及酒后驾驶的致命车祸密度图 (2017 年)。黄色区域表示涉及酒后驾驶的高密度交通事故区。

热点图的工作方式

热点图是通过将 HeatmapRenderer 实例设置为图层的 renderer 属性来创建的。HeatmapRenderer 具有几个关键属性。blurRadius 确定了点周围的影响区域。例如,如果将模糊半径设置为 10 像素,则单点的 10 个像素内的每个像素都将被分配一个强度值 1。屏幕上位于 10 像素模糊半径之外的像素,其强度值为 0

每个像素的强度值根据其与多个点的接近程度而进行累积。例如,仅单点的 10px 范围内的像素,其像素强度值为 1。10px 范围内的 10 个点的像素,其像素强度值为 10。

渲染器中的 colorStops 可根据像素比率(即 pixelIntensity / maxPixelIntensity)确定如何为像素着色。强度值等于或高于maxPixelIntensity 的像素的像素比为 1,应为其指定最亮的颜色,因为这些颜色代表最热的区域。maxPixelIntensity 越大,地图中存在的热点就越少。

示例

位置热点图

要创建热点图,必须将 HeatmapRenderer 应用于点图层。使用上述准则设置渲染器属性。在 CodePen 中打开此示例,调整 blurRadiusmaxPixelIntensity 以查看这些属性如何影响热点图。

致命车祸的密度图 (2017 年)。黄色区域表示高密度的交通事故区。
GeoScene JS API
42 42 42 42 42 42 42 42 42 42 42 42 42 42 42 42 42 42 42 42 42 42 42 42 42 42 42 42 42 42 42 42 42 42 42 42 42 42 42 42 42 42 43 44 45 46 47 48 49 50 51 52 53 54 55 56 57 58 59 60 61 62 63 64 65 65 65 65 65 65 65 65 65 65 65 65 65 65 65 65 65 65 65 65 65 65 65 65 65 65 65 65 65 65 65 65 65 65 65 65 65 65
1
2
3
4
5
6
7
8
9
10
11
12
13
14
15
16
17
18
19
20
21
22
23
24
25
26
27
28
29
30
31
32
33
34
35
36
37
38
39
40
41
42
43
44
45
46
47
48
49
50
51
52
53
54
55
56
57
58
59
60
61
62
63
64
65
66
67
68
69
70
71
72
73
74
75
76
77
78
79
80
81
82
83
84
85
86
87
88
89
90
91
92
93
94
95
96
97
98
99
100
101
102
<html>
  <head>
    <meta charset="utf-8" />
    <meta
      name="viewport"
      content="initial-scale=1,maximum-scale=1,user-scalable=no"
    />

    <title>
      Fatal car crashes
    </title>

    <style>
      html,
      body,
      #viewDiv {
        padding: 0;
        margin: 0;
        height: 100%;
        width: 100%;
    </style>

    <link rel="stylesheet" href="https://js.geoscene.cn/4.23/geoscene/themes/dark/main.css" />
    <script src="https://js.geoscene.cn/4.23/"></script>

    <script>
      require([
        "geoscene/WebMap",
        "geoscene/layers/FeatureLayer",
        "geoscene/views/MapView",
        "geoscene/widgets/Legend"
      ], (WebMap, FeatureLayer, MapView, Legend) => {
        const url = "https://services1.arcgis.com/4yjifSiIG17X0gW4/arcgis/rest/services/FatalAccidents2017/FeatureServer";
        const layer = new FeatureLayer({
          title: "Fatal car accidents (2017)",
        const colors = ["rgba(115, 0, 115, 0)", "#820082", "#910091", "#a000a0", "#af00af", "#c300c3", "#d700d7", "#eb00eb", "#ff00ff", "#ff58a0", "#ff896b", "#ffb935", "#ffea00"];

        layer.renderer = {
          type: "heatmap",
          colorStops: [
            { color: colors[0], ratio: 0 },
            { color: colors[1], ratio: 0.083 },
            { color: colors[2], ratio: 0.166 },
            { color: colors[3], ratio: 0.249 },
            { color: colors[4], ratio: 0.332 },
            { color: colors[5], ratio: 0.415 },
            { color: colors[6], ratio: 0.498 },
            { color: colors[7], ratio: 0.581 },
            { color: colors[8], ratio: 0.664 },
            { color: colors[9], ratio: 0.747 },
            { color: colors[10], ratio: 0.83 },
            { color: colors[11], ratio: 0.913 },
            { color: colors[12], ratio: 1 }
          ],
          blurRadius: 10,
          maxPixelIntensity: 111,
          minPixelIntensity: 0
        };
        const map = new WebMap({
          basemap: {
            portalItem: {
              id: "466f3f43c231453c938c6776777b89e2"
          layers: [ layer ]
        const view = new MapView({
          container: "viewDiv",
          center: [-117.79621, 33.91474],
          scale: 1155581,
          constraints: {
            snapToZoom: false,
            minScale: 4622324,
            maxScale: 1155500
          new Legend({
        "top-right");
    </script>
  </head>

  <body>
    <div id="viewDiv"></div>
  </body>
</html>
数据加权的热点图

本示例修改了上一个热点图,以按数据变量对表面进行加权。此示例中使用的车祸图层具有一个属性,用于统计事件中涉及醉酒司机的数量。我们可以通过按该字段加权来可视化更多醉酒司机所导致的致命事故的地方。

指定字段时,每个像素的像素强度值将乘以数据值,因此需要相应地调整 maxPixelIntensity

酒后驾驶导致死亡的车祸密度 (2017年)。黄色区域表示事故密度最高。
GeoScene JS API
42 42 42 42 42 42 42 42 42 42 42 42 42 42 42 42 42 42 42 42 42 42 42 42 42 42 42 42 42 42 42 42 42 42 42 42 42 42 42 42 42 42 43 44 45 46 47 48 49 50 51 52 53 54 55 56 57 58 59 60 61 62 63 64 65 66 67 68 69 70 70 70 70 70 70 70 70 70 70 70 70 70 70 70 70 70 70 70 70 70 70 70 70 70 70 70 70 70 70 70 70 70 70 70 70 70 70
1
2
3
4
5
6
7
8
9
10
11
12
13
14
15
16
17
18
19
20
21
22
23
24
25
26
27
28
29
30
31
32
33
34
35
36
37
38
39
40
41
42
43
44
45
46
47
48
49
50
51
52
53
54
55
56
57
58
59
60
61
62
63
64
65
66
67
68
69
70
71
72
73
74
75
76
77
78
79
80
81
82
83
84
85
86
87
88
89
90
91
92
93
94
95
96
97
98
99
100
101
102
103
104
105
106
107
<html>
  <head>
    <meta charset="utf-8" />
    <meta
      name="viewport"
      content="initial-scale=1,maximum-scale=1,user-scalable=no"
    />

    <title>
      Fatal car crashes
    </title>

    <style>
      html,
      body,
      #viewDiv {
        padding: 0;
        margin: 0;
        height: 100%;
        width: 100%;
    </style>

    <link rel="stylesheet" href="https://js.geoscene.cn/4.23/geoscene/themes/dark/main.css" />
    <script src="https://js.geoscene.cn/4.23/"></script>

    <script>
      require([
        "geoscene/WebMap",
        "geoscene/layers/FeatureLayer",
        "geoscene/views/MapView",
        "geoscene/widgets/Legend"
      ], (WebMap, FeatureLayer, MapView, Legend) => {
        const url = "https://services1.arcgis.com/4yjifSiIG17X0gW4/arcgis/rest/services/FatalAccidents2017/FeatureServer";
        const layer = new FeatureLayer({
          title: "Fatal car accidents involving drinking (2017)",
        const colors = ["rgba(115, 0, 115, 0)", "#820082", "#910091", "#a000a0", "#af00af", "#c300c3", "#d700d7", "#eb00eb", "#ff00ff", "#ff58a0", "#ff896b", "#ffb935", "#ffea00"];

        layer.renderer = {
          type: "heatmap",

          field: "Number_of_Drinking_Drivers",

          colorStops: [
            { color: colors[0], ratio: 0 },
            { color: colors[1], ratio: 0.083 },
            { color: colors[2], ratio: 0.166 },
            { color: colors[3], ratio: 0.249 },
            { color: colors[4], ratio: 0.332 },
            { color: colors[5], ratio: 0.415 },
            { color: colors[6], ratio: 0.498 },
            { color: colors[7], ratio: 0.581 },
            { color: colors[8], ratio: 0.664 },
            { color: colors[9], ratio: 0.747 },
            { color: colors[10], ratio: 0.83 },
            { color: colors[11], ratio: 0.913 },
            { color: colors[12], ratio: 1 }
          ],
          blurRadius: 10,

          maxPixelIntensity: 21,

          minPixelIntensity: 0
        };
        const map = new WebMap({
          basemap: {
            portalItem: {
              id: "466f3f43c231453c938c6776777b89e2"
          layers: [ layer ]
        const view = new MapView({
          container: "viewDiv",
          center: [-117.79621, 33.91474],
          scale: 1155581,
          constraints: {
            snapToZoom: false,
            minScale: 4622324,
            maxScale: 1155500
          new Legend({
        "top-right");
    </script>
  </head>

  <body>
    <div id="viewDiv"></div>
  </body>
</html>
API 支持

下表描述了非常适合每种可视化技术的几何和视图类型。

完全支持部分支持不支持
  • 1. 不支持通过选择减少要素
  • 2. 仅支持通过选择减少要素
  • 3. 仅支持比例驱动过滤

Your browser is no longer supported. Please upgrade your browser for the best experience. See our browser deprecation post for more details.