在线预览 使用微件是 GeoScene API for JavaScript 的重要组成部分。通常,微件被认为是封装一组特定功能的 API 的一部分。 API 提供具有预定义功能的即用型微件。在某些情况下,您可能需要根据自己的规范自定义微件。在这些情况下,可能需要自定义微件。以下步骤将创建一个非常基本的“Hello World”微件。此外,此示例还展示了如何在自定义微件中使用自己的本地化消息包。这些步骤是创建您自己的自定义微件时所需的基本基础。
此示例描述了如何实现和创建自定义微件。除了这个基本的“HelloWorld”示例之外,该应用程序还展示了如何使用消息包在微件中显示本地化字符串。下面讨论实现这一点的步骤。
有关完整代码,请参阅此链接以获取源代码 并单击下拉列表以获取各种文件。
微件开发使用 TypeScript 编写并编译为 JavaScript。为了遵循以下步骤,您需要确保已安装 TypeScript 。只要您能够将生成的 TypeScript 代码编译成生成的 JavaScript 文件,任何文本编辑器都应该足够了。除此之外,您还应该熟悉 JSX 。这允许您以类似于 HTML 的方式定义微件的 UI。最后,微件开发很大程度上依赖于对实现访问器 的熟悉程度。有关这些要求的更多信息,请访问:
编写 TypeScript 不需要一个特定的 IDE。只要您可以访问生成底层 JavaScript 文件所需的编译器,任何 IDE 都应该可以工作。
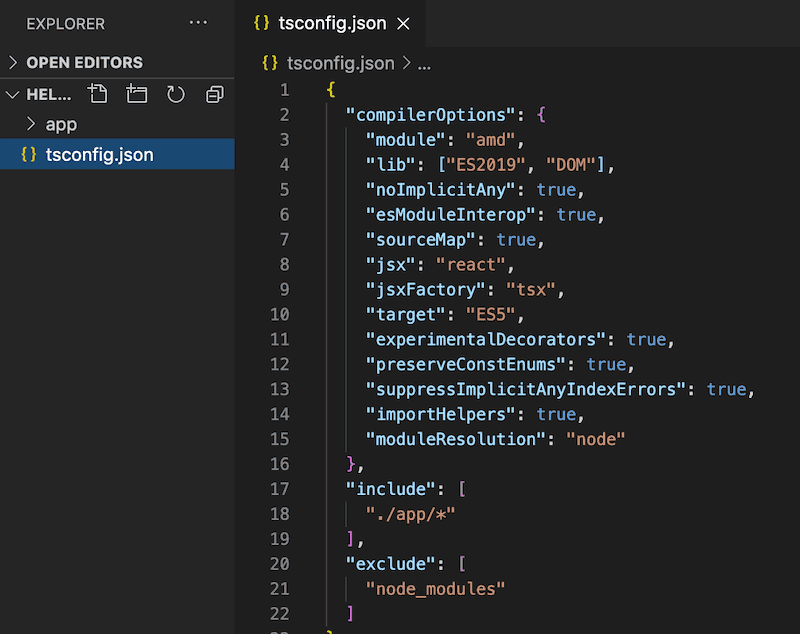
创建一个新目录以包含所有微件文件。在下面的屏幕截图中,使用了 Visual Studio Code 。这是与 TypeScript 配合得很好的免费下载的软件。创建了一个名为 HelloWorld 的新文件夹。Web 服务器也应该可以访问此文件夹。
在 HelloWorld 目录中,创建另一个名为 app 的目录,这将只包含微件的文件。在 app 目录中,创建一个名为 HelloWorld.tsx 的新文件。
每个小部件都属于一个 .tsx 文件,它允许您使用 JSX 定义用户界面。
在 tsconfig.json 文件中,添加以下代码段:
1
2
3
4
5
6
7
8
9
10
11
12
13
14
15
16
17
18
19
{
"compilerOptions" : {
"module" : "amd" ,
"lib" : [ "ES2019" , "DOM" ],
"noImplicitAny" : true ,
"esModuleInterop" : true ,
"sourceMap" : true ,
"jsx" : "react" ,
"jsxFactory" : "tsx" ,
"target" : "ES5" ,
"experimentalDecorators" : true ,
"preserveConstEnums" : true ,
"suppressImplicitAnyIndexErrors" : true ,
"importHelpers" : true ,
"moduleResolution" : "node"
},
"include" : [ "./app/*" ],
"exclude" : [ "node_modules" ]
}
tsconfig.json 文件指定根文件和编译器选项 需要编译项目。
请参阅 tsconfig.json 文档 了解特定于 include 的其他信息和 exclude 选项。
有关在您的环境中设置 TypeScript 的详细讨论,请参阅 TypeScript 设置 指南主题。
为了使用 GeoScene API 进行 JavaScript 输入,您需要通过一个简单的命令行命令安装它们。
打开命令提示符并浏览到 HelloWorld 目录。 在命令行中输入以下内容
1
2
npm init --yes
npm install --save @types/geoscene-js-api
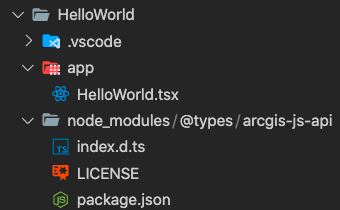
您现在应该看到的是项目目录根目录中的 package.json 文件,此外还有一个新的 node_modules 目录,其中包含所有这些用于 JavaScript 类型的 GeoScene API。
现在您已准备好实际实现自定义微件。
打开 HelloWorld.tsx 并添加以下代码行。
1
2
3
4
5
6
7
8
9
10
import { subclass, property } from "geoscene/core/accessorSupport/decorators" ;
import Widget from "geoscene/widgets/Widget" ;
import { tsx, messageBundle } from "geoscene/widgets/support/widget" ;
const CSS = {
base : "esri-hello-world" ,
emphasis : "esri-hello-world--emphasis"
};
请注意,即使代码示例中没有明确使用 tsx。
这不是必需的,但如果使用 tsconfig.json 选项 "noUnusedLocals": true,则需要在代码中引用 tsx, 如同
1
2
import { tsx } from "geoscene/widgets/support/widget" ;
tsx; // Reference tsx here, this will be used after compilation to JavaScript
最后,我们使用 base 和 emphasis 属性设置一个 CSS 对象。这些在微件的 render() 方法中使用,并用作类的查找,从而集中微件中的所有 CSS。 现在在 HelloWorld.tsx 文件中,添加以下代码行。
1
2
3
4
5
6
@subclass ( "esri.widgets.HelloWorld" )
class HelloWorld extends Widget {
constructor ( params?: any ) {
super (params);
}
}
在这里,我们扩展了 Widget 基类。@subclass 装饰器是从给定基类构造子类所必需的。
在此类实现中,添加以下属性:
1
2
3
4
5
6
7
8
9
10
11
12
13
14
15
16
17
18
19
20
21
22
23
24
25
26
27
28
29
30
31
32
33
34
35
36
@subclass ( "esri.widgets.HelloWorld" )
class HelloWorld extends Widget {
constructor ( params?: any ) {
super (params);
}
//----------------------------------
// firstName
//----------------------------------
@property ()
firstName : string = "John" ;
//----------------------------------
// lastName
//----------------------------------
@property ()
lastName : string = "Smith" ;
//----------------------------------
// emphasized
//----------------------------------
@property ()
emphasized : boolean = false ;
//----------------------------------
// messages
//----------------------------------
@property ()
@messageBundle ( "HelloWorld/assets/t9n/widget" )
messages : { greeting : any ; } = null ;
}
前三个属性有一个 @property 装饰器。此装饰器用于定义 Accessor 属性。通过指定此装饰器,您可以赋予此属性与 API 中其他属性 相同的行为。
最后一个属性 @messageBundle 设置 bundleId 用于本地化微件。这很有用,因为它会自动使用传入的 bundleId 指定的本地化消息包填充微件。此 bundleId 必须首先注册。有关如何执行此操作的更多信息显示在下面的步骤中。
现在,您将向微件添加公共和私有方法。
1
2
3
4
5
6
7
8
9
10
11
12
13
14
15
16
17
18
// Public method
render ( ) {
const greeting = this ._getGreeting();
const classes = {
[CSS.emphasis]: this .emphasized
};
return (
< div class = {this.classes(CSS.base, classes )}>
{greeting}
</ div >
);
}
// Private method
private _getGreeting(): string {
return `Hello, my name is ${ this .firstName} ${ this .lastName} !` ;
}
render() 方法是 API 中唯一必须实现的必需成员。此方法必须返回有效的 UI 表示。JSX 用于定义 UI。话虽如此,重要的是要注意我们没有使用 React 。转译后的 JSX 使用自定义 JSX factory 进行处理,因此在实现自定义微件和 React 组件之间没有直接等效性。
上面的代码片段设置了两个名为 greeting 和 classes 的变量。默认情况下,元素中引用的函数会将 this 设置为实际元素。您可以使用特殊的 bind 属性来更改它,例如 bind={this}。
class 属性不能在 render() 方法中更改。如果有动态类,请使用 classes 辅助方法。
例如,
1
2
3
4
5
6
7
8
9
render ( ) {
const baseClass = this .isBold && this .isItalic ? ` ${CSS.base} ${CSS.bold} ${CSS.italic} ` :
this .isBold ? ` ${CSS.base} ${CSS.bold} ` :
this .isItalic ? ` ${CSS.base} ${CSS.italic} ` :
CSS.base;
return (
< div class = {baseClass} > Hello World! </ div >
);
}
将引发运行时错误,因为 class 无法更改。而是使用,
1
2
3
4
5
6
7
8
9
render ( ) {
const dynamicClasses = {
[CSS.bold]: this .isBold,
[CSS.italic]: this .isItalic
};
return (
< div class = {this.classes({CSS.base, dynamicClasses })> Hello World! </ div >
);
}
最后,greeting 消息返回 Hello, my name is ${this.firstName} ${this.lastName}!
在代码页的最后,添加一行到 export 将对象转换为易于使用的外部模块。
现在小部件的代码已经实现,将 .tsx 文件编译为它的底层 JavaScript 实现。
在命令提示符下,浏览到 HelloWorld 目录的位置并键入tsc。此命令将查看您的 tsconfig.json 文件并根据其配置编译 TypeScript。
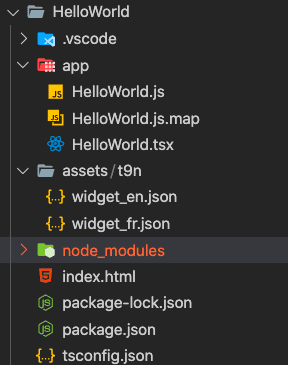
您现在应该在 .tsx 文件所在的同一目录中生成一个新的 HelloWorld.js 文件,此外还有一个 HelloWorld.js.map sourcemap 文件。
如果需要,将提供源图。对于这个特定的示例,它确实不是必需的,但我们展示了如何创建一个,因为它在某些情况下可能很有用。
现在您已经为微件生成了底层 .js 文件,可以将它添加到您的 JavaScript 应用程序中。在同一 HelloWorld 目录中,创建一个 index.html 文件。
微件引用 .geoscene-hello-world 和 .geoscene-hello-world-emphasis 类。添加一个引用这些类的样式元素,如下所示。
1
2
3
4
5
6
7
8
9
10
11
12
< style >
#btnSpace {
padding : 10px ;
}
.geoscene-hello-world {
display : inline-block;
}
.geoscene-hello-world--emphasis {
font-weight : bold;
}
</ style >
创建自定义微件后,您需要加载它。这归结为告诉 Dojo 的模块加载器如何解析微件的路径,这意味着将模块标识符映射到 Web 服务器上的文件。在 SitePen 博客上,有一篇文章 讨论了别名、路径和包之间的差异,这可能有助于缓解任何特定于此的问题。
尽管 Dojo 已从大部分 API 中删除,但在这种情况下仍需要加载 AMD 模块。
添加处理加载此自定义微件的脚本元素,如下所示。
1
2
3
4
5
6
7
8
9
10
11
< script >
let locationPath = location.pathname.replace( /\/[^\/]+$/ , "" );
window .dojoConfig = {
packages : [
{
name : "app" ,
location : locationPath + "/app"
}
]
};
</ script >
既然 Dojo 知道在 app 文件夹中的哪里可以找到模块,那么可以使用 require 来加载它以及应用程序使用的其他模块。
这是一个加载 app/HelloWorld 和 geoscene/intl 模块的 require 块。
1
2
3
require ([ "app/HelloWorld" , "geoscene/intl" ], ( HelloWorld, intl ) => {
});
首先,为了更新区域设置以使用设置的消息包的字符串,您必须首先注册它。有几种方法可以做到这一点。两者都在示例代码中提供。这里提供了第一个选项,而第二个选项在源代码中被注释掉并且做同样的事情。
消息包是一个包含翻译的对象,可以作为文件存储在磁盘上,也可以作为代码中的对象存储。在内部,适用于 JavaScript 的 GeoScene API 使用包含本地化翻译的 JSON 文件。这些捆绑包由唯一的字符串标识,即 bundleId。对于这个特定示例,使用为英语和法语提供的字符串创建了两个单独的 JSON 文件。有关使用语言环境和注册消息包的更多信息,请参阅 geoscene/intl API 文档 。
以下假设文件夹结构类似于如下所示。
1
2
3
4
5
6
7
8
9
root-folder/
  app/
    .tsx
    .js
  assets/
    t9n/
      widget_en.json
      widget_fr.json
  index.html
1
2
3
4
5
6
7
8
9
10
11
12
13
intl.registerMessageBundleLoader({
pattern : "widgets-custom-widget/assets/" ,
async fetchMessageBundle ( bundleId, locale ) {
const [, filename] = bundleId.split( "/t9n/" );
const knownLocale = intl.normalizeMessageBundleLocale(locale);
const bundlePath = `./assets/t9n/ ${filename} _ ${knownLocale} .json` ;
// bundlePath is "https://domain-URL/widgets-custom-widget/assets/t9n/widget_<locale>.json"
const response = await fetch(bundlePath);
return response.json();
}
});
接下来,我们将创建一个 names 数组,用于循环显示并显示在微件的问候语中。
1
2
3
4
5
6
let names = [
{ firstName : "John" , lastName : "Smith" },
{ firstName : "Jackie" , lastName : "Miller" },
{ firstName : "Anna" , lastName : "Price" }
],
nameIndex = 0 ;
我们现在将使用以下语法实例化微件。
1
2
3
4
5
const widget = new HelloWorld({
firstName : names[nameIndex].firstName,
lastName : names[nameIndex].lastName,
container : "widgetDiv"
});
接下来,我们将创建一个函数来循环遍历名称。
1
2
3
4
5
function changeName ( ) {
widget.set(names[nameIndex++ % names.length]);
}
setInterval (changeName, 1000 );
最后,创建一个简单的按钮并连接其单击事件处理程序以将语言环境更改为英语或法语。
1
2
3
4
5
6
7
8
9
const btnLocale = document .createElement( "button" );
btnLocale.style.padding = "10px" ;
btnLocale.classList.add( "app-locale-button" )
btnLocale.innerHTML = "Toggle Locale" ;
document .getElementById( "btnSpace" ).appendChild(btnLocale);
btnLocale.addEventListener( "click" , () => {
intl.getLocale() === "fr" ? intl.setLocale( "en" ) : intl.setLocale( "fr" );
});
您完成的教程应该类似于下面的文件。
index.html index.html HelloWorld.tsx HelloWorld.js widget_en.json widget_fr.json
1
2
3
4
5
6
7
8
9
10
11
12
13
14
15
16
17
18
19
20
21
22
23
24
25
26
27
28
29
30
31
32
33
34
35
36
37
38
39
40
41
42
43
44
45
46
47
48
49
50
51
52
53
54
55
56
57
58
59
60
61
62
63
64
65
66
67
68
69
70
71
72
73
74
75
76
77
78
79
80
81
82
83
84
85
86
87
88
89
90
91
92
93
94
95
96
97
98
99
100
101
102
103
104
105
106
107
108
109
110
111
112
113
114
115
116
117
118
119
120
121
122
123
<!DOCTYPE html >
< html >
< head >
< meta charset = "utf-8" />
< meta name = "viewport" content = "initial-scale=1,maximum-scale=1,user-scalable=no" />
< title > Create a custom widget | Sample | GeoScene API for JavaScript 4.22 </ title >
< style >
#btnSpace {
padding : 10px ;
}
.geoscene-hello-world {
display : inline-block;
}
.geoscene-hello-world--emphasis {
font-weight : bold;
}
</ style >
< script >
let locationPath = location.pathname.replace( /\/[^\/]+$/ , "" );
window .dojoConfig = {
packages : [
{
name : "app" ,
location : locationPath + "/app"
}
]
};
</ script >
< script src = "https://js.geoscene.cn/4.23/" > </ script >
< script >
let widget;
require ([ "app/HelloWorld" , "geoscene/intl" ], ( HelloWorld, intl ) => {
// register message bundle loader for HelloWorld messages
intl.registerMessageBundleLoader({
pattern : "widgets-custom-widget/assets/" ,
async fetchMessageBundle ( bundleId, locale ) {
const [, filename] = bundleId.split( "/t9n/" );
const knownLocale = intl.normalizeMessageBundleLocale(locale);
const bundlePath = `./assets/t9n/ ${filename} _ ${knownLocale} .json` ;
const response = await fetch(bundlePath);
return response.json();
}
});
// It is also possible to register the message bundle
// loader using syntax similar to what is provided below.
// The 'createJSONLoader' is a helper function that provides similar
// functionality to what the intl. registerMessageBundleLoader
// function does above.
// const bundleName = "widgets-custom-widget/assets/t9n/widget";
// (async () => {
// intl.registerMessageBundleLoader(
// intl.createJSONLoader({
// pattern: "widgets-custom-widget/",
// base: "widgets-custom-widget",
// location: new URL("./", window.location.href)
// })
// );
// let bundle = await intl.fetchMessageBundle(bundleName);
// })();
let names = [{
firstName : "John" ,
lastName : "Smith"
},
{
firstName : "Jackie" ,
lastName : "Miller"
},
{
firstName : "Anna" ,
lastName : "Price"
}
],
nameIndex = 0 ;
const widget = new HelloWorld({
firstName : names[nameIndex].firstName,
lastName : names[nameIndex].lastName,
container : "widgetDiv"
});
function changeName ( ) {
widget.set(names[nameIndex++ % names.length]);
}
setInterval (changeName, 1000 );
// Add a very basic button that allows toggling the locale of the
// displayed string.
const btnLocale = document .createElement( "button" );
btnLocale.style.padding = "10px" ;
btnLocale.classList.add( "app-locale-button" )
btnLocale.innerHTML = "Toggle Locale" ;
document .getElementById( "btnSpace" ).appendChild(btnLocale);
// Add an event listener for when the button is clicked
// If the locale is French, change to English
// If the locale is English, change to French
btnLocale.addEventListener( "click" , () => {
intl.getLocale() === "fr" ? intl.setLocale( "en" ) : intl.setLocale( "fr" );
});
});
</ script >
</ head >
< body >
< div id = "widgetDiv" class = "geoscene-widget" > </ div >
< div id = "container" class = "geoscene-widget" >
< div id = "btnSpace" > </ div >
</ div >
</ body >
</ html >
可以从上面的源代码访问此示例中使用的文件。请使用这些文件作为开始创建您自己的自定义类和微件的起点。


